
How to Edit Redirector Basic Information
The redirector is the smart link you use in your campaigns. You can change the main information at any time.
Where to Find the Settings
Section titled “Where to Find the Settings”- Go to the Grupos Inteligentes Dashboard.
- In the side menu, click on Redirectors.
- Click the View button on the redirector you want to edit.
- On the page that opens, click the Settings tab.
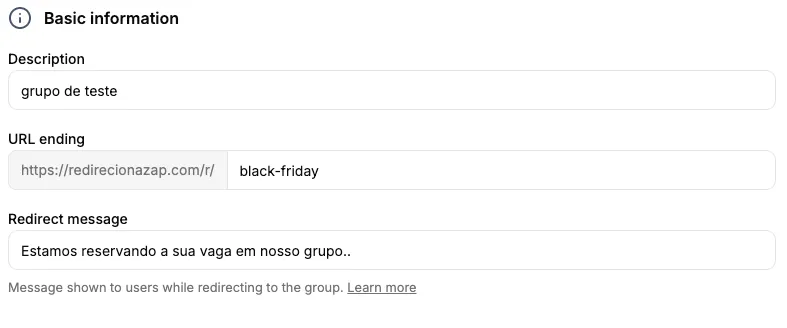
What You Can Edit
Section titled “What You Can Edit”Description
Section titled “Description”This is the internal name you use to identify this link. This information is for your organization only — it does not appear to users.
- What to enter: An easy-to-remember name for your campaign
- Examples: “March 2026 Launch”, “Facebook Sales”, “Black Friday”
- Limit: Up to 255 characters
URL Suffix (read-only)
Section titled “URL Suffix (read-only)”This is the custom part that appears at the end of your public link. The URL suffix is auto-generated from the description at creation time and cannot be changed afterwards.
- How it looks:
redirecionazap.com/r/your-url-ending-here - Rules:
- Use only letters, numbers, hyphens (-), and underscores (_)
- Do not use spaces or special characters (@, #, $, etc.)
- Limit of 20 characters
- Case-sensitive
Redirect Message
Section titled “Redirect Message”This is the text shown on the user’s screen while they are being forwarded to the WhatsApp group.
- What to enter: A short message to inform what is happening
- Examples: “Joining the group…”, “Processing your access…”, “Please wait…”
- Limit: Up to 64 characters
- When it’s useful: Makes it clear the system is working, prevents the user from leaving the page
Fallback
Section titled “Fallback”When all groups in the redirector are full, you choose what happens to the visitor:
- Waitlist page (Scale): The system displays an automatic capture page. The visitor can leave their contact and you receive the lead in the Leads tab.
- Redirect URL: The visitor is sent to an external page of your choice (form, direct WhatsApp, product page).
Google Analytics 4
Section titled “Google Analytics 4”Connect Google Analytics 4 to your redirector with one click. After connecting, clicks are automatically sent as events to GA4.
- How to set up: Click Connect with Google and authorize access
- Benefit: Track clicks, devices, location, and UTMs directly in GA4
For more details, see the complete GA4 integration guide.
Meta Pixel
Section titled “Meta Pixel”Connect Meta Pixel to your redirector and find out which Facebook ads are driving visitors. The connection is made directly with your Facebook account, with no code required.
- How to set up: Click Connect Meta Pixel and authorize access
- Benefit: Track redirector visits within your Meta campaigns
For more details, see the complete Meta Pixel integration guide.
Monitoring Interval
Section titled “Monitoring Interval”If you use automatic participant updates (Scale plan), you can set how often the system checks the member count in your groups.
- Options: instant or every 7 days
- Recommendation: use instant mode for active launches; it requires connecting your WhatsApp account
How to Save Changes
Section titled “How to Save Changes”- After editing the desired fields, click Save changes at the bottom.
- The Save changes button only becomes active when you have made a change.
- A confirmation message will appear if everything goes well.
Common Situations
Section titled “Common Situations”You want a more professional link → Create a new redirector with your desired URL suffix. The URL suffix cannot be changed after creation.
Forgot what the link was called → Use the description with a descriptive name you can easily remember.
Want to change the redirect message → Just edit the redirect message field.
Next Steps
Section titled “Next Steps”After editing the basic information:
- Set up the distribution mode for leads
- Configure the fallback for when groups are full
- Configure your trackers to measure results
- Enable automatic update if you’re a Scale subscriber
- Capture leads with the waitlist when groups are full
- Connect Google Analytics 4 to your redirector
- Connect Meta Pixel to your redirector